Viser innlegg med etiketten art tips. Vis alle innlegg

søndag 24. mai 2015

"Georgina"mixed mediaI ha,photoshop CC


                          Technique:

                           Began with just the drawing of the girl with Koh-I-Noor pencils.
                          Then took it into photoshop and began playing with brushes.
                           I have little patience, so I just began using a regular round brush
                           and drew zig-zag, and ereased the part I didn't want.
                          Simple,but it can make some interesting textures and patterns,
                           I think. The feather brush is my own.

                           Hope you like it, and have a nice Pentecost!:)


lørdag 1. november 2014

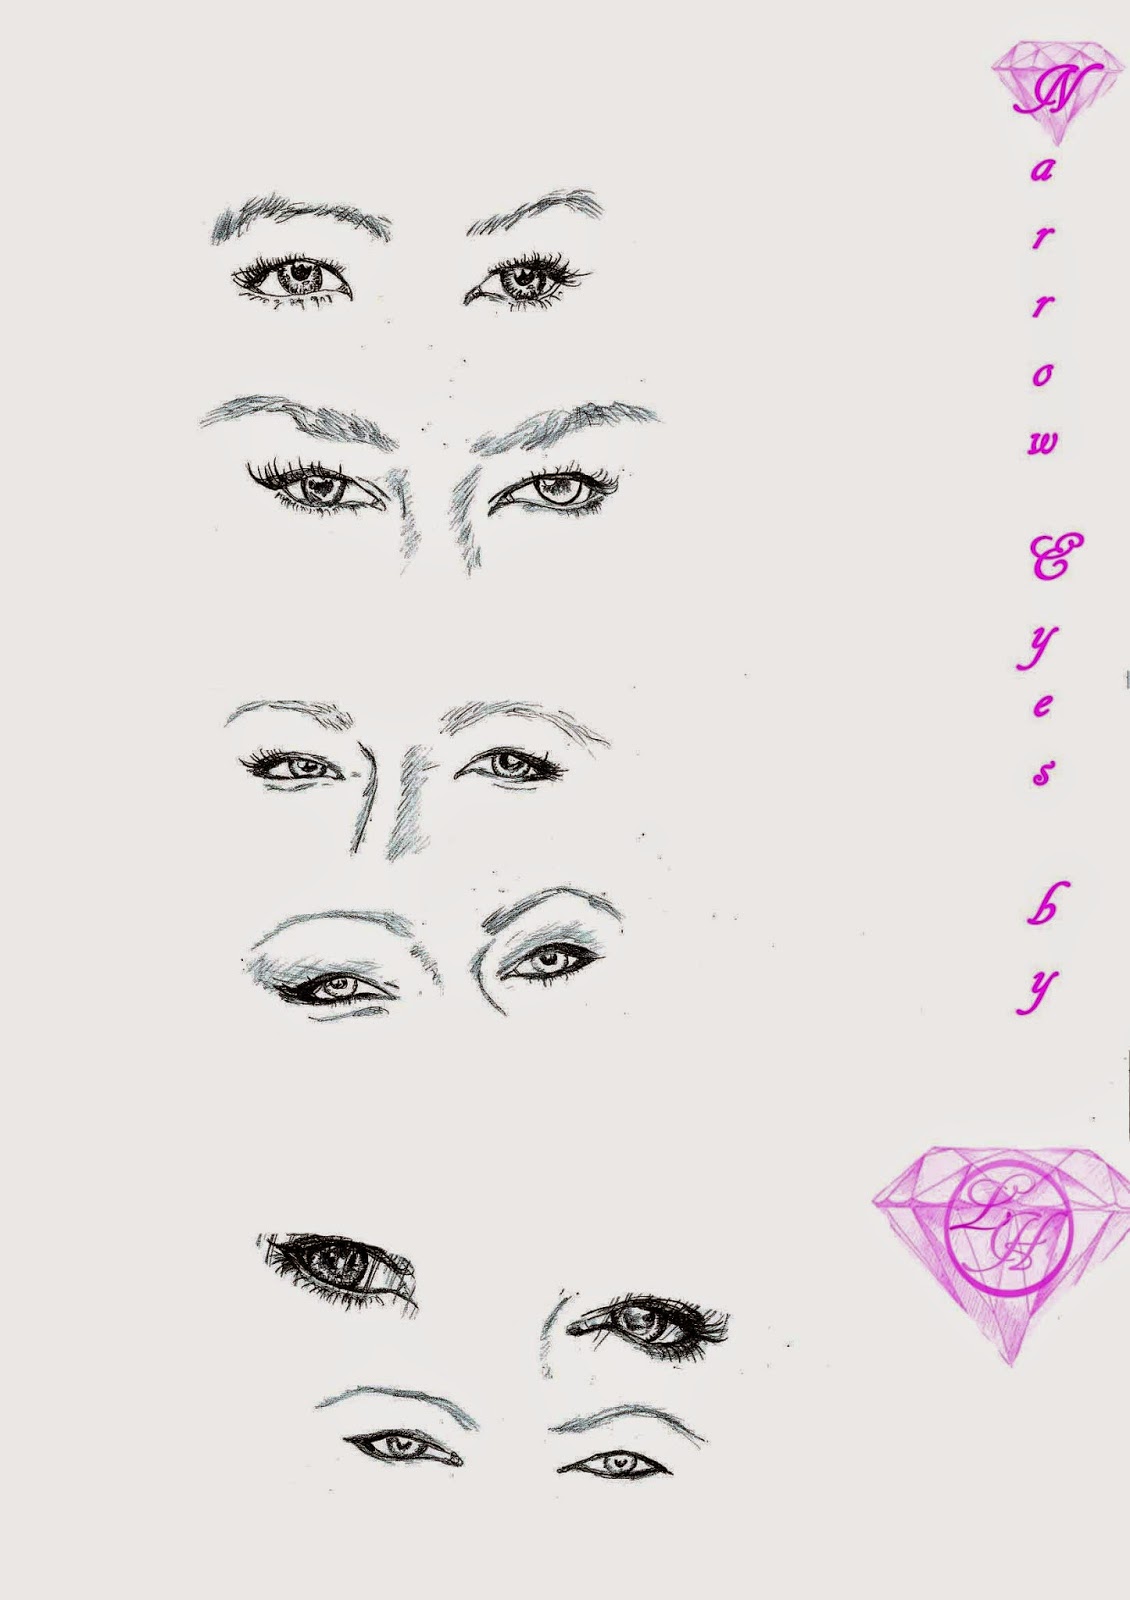
Drawing Eyes-A complete tutorial! -Eyeshapes and eyelids


                      Hey guys-
                      As promised, I have made a post just about how to draw eyes!
                      Now, the first I would like to mention is that practice makes perfect.
                      Practise on people you know, and celebrities.

                      A trick I always use when I'm going to draw something is to think of
                      a celebrity or someone I know-let's say OK, I want to draw someone with
                      sexy smokey cat eyes. Examples of celebrites can be
                      Renee Zellweger (before the plastic surgery) Taylor Swift and
                    Laura Prepon from "That  70's Show" and " Orange is the new Black."


But to achive this, we have to learn the correct anatomy. Every person has their
own charesteristics, but let's say there are 5 types of eyelids and eyesocket-this goes for 
both men and women. I will get to the difference between male and female eyes in a bit.


I like real-life examples, So let's say one example for Hidden in the eyesocket was Renee Zellweger.
Laura Prepon has beautiful narrow eyes, which also goes a bit under that category.Both of them also has a bit of number four-almost no visible eyelids,but its important to remember that this also depends on the light and the facial expression that you are going to draw. Also, remember
that a person with small and narrow eyes will not have very large eyelashes. You can fake everything
with make-up, but if the person you are going to draw has very narrow eyes they will most likely
not have very large eyelids, and will have to use a lot of mascara to achive great eyelashes.

I will advice you to be careful when you draw narrow eyes. 

An example of high upper eyelid I think is Susan Sarandon.
Having a bit of protruding eyes does not neccecarily mean eyes like that woman from The Shining,
but sometimes people with those kind of eyes can look a bit naive.
Worth thinking of if you're going to create a character!;)


The banana I actually thought of myself,haha-but when you're a beginner you are always taught that
the eye is like a almond. If you find another type of fruit that reminds you of the shape,that's up to you;)  Just remember that narrow eyes are less round and they will not look so "awake" as a round or almond shaped eye-exept when the person is laughing, then both will have that look you get when you're laughing so hard that you're eyes are almost or completely closed.


A good practice will be to sketch models, people you know or scenes from movies. Notice that 
when a person laughs, the eyebrows will point slitghtly up. If you're going to do a realistic thrtrait,that is.;)

You will also get those smiling wrinkes in the corner of your eyes when you're laughing really hard,but go easy on the wrinkes the younger the person is. However,even Angelina Jolie has eye-wrinkles, you just have to be careful when you draw.


This should be pretty easy to follow, but I will cover hooded eyes and asian eyes 
a bit more.  Hooded eyes means that you have a bit of skin hanging over your eyes,which will
give them a bit of a sad look. People with these kinds of eyes can also have an almond eye-shape.

It is like body types; most people are not "just" an apple or a pear-figure.Often you will
be a combination. The same rule goes for eyes, also asian eyes. 


Asian eyes:

Important to remember that the difference between asian and chinese eyes and non-asian eyes
is that they have almost or no visible eyelids. This applies also for some none-asian eyes, but let's just call that the common drawing-rule. for asian eyes.


The most common eye colour in the world is brown, and the rarest is green-did you know that?;)

Anyway, play with shape and colour and you will achive amazing results!


OK! Now we have been through most of it, so at last,let's go through the difference betweeen

Male and female eyes.


The difference is simple; we have the same form of eye shapes, but most of the time-the exeptions I already mentioned with the narrow eyes;- A female eye will have a slithtly more rounded eye.

However, there is absolutely no rule that says a man can't have an almond eye shape.


Just remember that men often have a bit more thick,heavy and darker eyebrows.
Men also have eyelashes;) I think a good rule, male or female, is like I mentioned before
on the narrow eyes that you are very careful when you draw eyelashes. Some men have long eyelashes, but that doesn't necessarily mean that they wear mascara;) The exeption of course is if you're going to draw a rock star with eyeliner. 

Most men-and women have the shortest and few eyelashes where the eye begins and
more heavy eyelashes near the end.It is better to draw careful and with few, short eyelashes, and
if you want a heavier look then you can go for it once you take a step back and see
how your drawing is going to look.


lørdag 31. mai 2014

Gorgeous! -Traditonal art,drawing of blonde girl +How to store your art supplies


          Tools:
         Graphite pencils, exept a little Cretacolour colour pencils on the eyes and lips.
         While I was working, I saw that it would look much better with a little more colour.

        I also used a bit of cotton for smooth skin and a mechanical pencil for the sketching and
        for the hair.

         My art tip this week;
         I came across this list http://www.blogmetrics.org/art#ultimate
        this week-it's a great place to look if you need a bit of inspiration or simply want
        to look at some pretty art!

        I would also like to talk a little about a little problem;
        How do you store your art supplies?

        Here are my tips:

        -Buy some large boxes for your art supplies, such as your good character blocks.
        -You can buy for example a tea box for keeping the colour pencils you use often.
        I have one in pink and green that I bought at TGR for about 20 crowns that i keep my
        Derwent pencils-most of them I use for skin colour.
        -You can also use your creativity and use a large box that you already have in your
         house-I now use a large shoe-box which once contained my Italian stilettos;)
         now they containes my set of Prismacolour set,Polycolour and Inktense pencils.

     
           You should also have at least one big drawer or a large box for keeping your
          folders. You should have both some A3 folders and some A4 folders for your
         artwork and keep them in a cool, safe place.

         You can also get special art boxes from art stores-be sure to buy some while
         you can, you will be grateful for it later! I got a plastic box from Panduro
         (Panduro is located in Karl Johans gate in Oslo) which is I keep some
         small watercolour packages and some ink. Søstrene Grene in Oslo also has
          some cute boxes if you're have a low budget but want something nice
         to keep your colour pencils/ other art supplies in.:)

        If you got some tips on how to keep your art supplies, feel free to comment!
     
       Have a great weekend!


søndag 6. april 2014

PRISMACOLOUR Colour Pencils-HOW TO DRAW BLONDE HAIR


                            80 `S BLONDE :
                           Remember, there is different kinds of blonde hair.
                           Mixing a bit of different colours gives an interesting contrast in 
                           the image.

                          Hi guys-this will probably be my last blog before easter.
                          For new readers, welcome to my
                          Prismacolour blondt hår tutorial!

                        1.First of all, I assume that you've got a set of Prismacolour pencils available-
                        you can also use other kinds like Faber Castell or Lycra, but I recommend
                        Prismacolour pencils becouse they give that thick texture that you want to get
                        when you draw hair.

                       2. I recommend that you also use heavyweight paper-you can use cheap paper, but
                       I warn you-the result will not be good. For good results you need to use good,
                       heavyweight paper with a smooth surface that you can get in artstores.
                       I also recommend that you buy so much as you can afford-becouse once
                       you get started, you will do mistakes and you will need more paper.
                       Don't be afraid-the fool who never maked a mistake never learned anything!
                        Keep that in mind.

                     3.Also, I recommend using a bit of small paper that you keep close when you`re
                     drawing. Yes, colour pencil is a lot like painting-if you practice blending you
                     will know what works and what looks like crap.;)


                MEDIUM BLONDE WITH DARK ROOTS:
                This is probably the hardest to draw. My advice is actually to  rather draw the hair a
                little lighter than it actually is- it will look  better.
                Start with a light colour, like cream and draw the outlines-decide at that stage how
                you want the hair to fall. Draw light, wave circles and then began to add value.
                Remember to leave in places for higlights!
                Yes, you can use an ereaser but the result will not be as good as if you left the place.
               Be careful when  you draw, take a step back once in a while and see where the light falls.
               It's easy to either draw to light or too dark-you want to make a good medium colour.
               When you are satisfied with the value, then use a white or blending pencil and blend the
               colours together. Be careful!

                I recommend Prisma Cream, Goldenrod and light umbra brown for this hair colour.


ICE-BLONDE/PlATINA BLONDE:
I will actually give you two tips here;
On the drawing in the picture I just used a regular Derwent grapite pencil and
then added carefully a bit of purple and light yellow from my Prismacolour set.
               Remember platina blonde hair does not have dark roots, so when you begin to draw
 I recommend that you use a light grey pencil, and then add colour and value.
                    It depends on the picure that you want to make-remember that platina blonde hair will 
also look darker if you decide to have a darker background, for example in a scary place-
but if you want the background to be as clean an white as possible you need to make sure
that the hair is visible, but make it a rule to leave in lots of place for highlights when you
make the outline and then just add a couple of stresses where you want the hair to be visible.

I would use a light colour for this, like cream and then add a bit of forexample gold metallic
for the places that needs to be quite dark.


I really recommend this paper;
Daler Rowney The Langton Watercolour paper section
becouse it`s really smooth and is a good choice for adding lots of colour.
Always use at least 180 grams, but the heavier the paper, the better.


 MY TIPS FOR WHAT KIND OF PRISMACOLOUR PENCILS
USING THE BLONDE HAIR:

FAIR-SKIN-LIGHT BLONDE HAIR:
(Example:Christina Aguilera)
Skin: PC 939 Peach
PC 928 Blush Pink
Hair: PC 941, PC 914 Cream, PC 1084 Gingembre,
PC 950 Metallic Gold.

STRAWBERRY BLONDE HAIR:
(Example: Nicole Kidman)
Skin: pc 927 Peach
PC 939, PC 1034
Hair: PC 943 Burnt Ochre, PC 1034 Goldenrot
PC 942 Yellow Ochre,
PC 1003 Spanish Orange,
PC 1002 yellowed Orange

FAIR SKIN-MEDIUM-dark hair:
Skin: PC 927, PC 928, PC 939
Hair: PC 941 Letts Umber
PC 1084 Ginger Root
PC 1034 Goldenrot

.
.and blend with  a white prismacolour pencil or a blending pencil.I like the blending pencil from
Derwent.:)


I recommend making sheets like this.Make them and put them in  a binder
so you can find it easily the next time you make something-your own colour library!:)

TIPS FOR BECOMING A GOOD COLOUR PENCIL ARTIST:
-Draw after pictures, and try to make the colour of the hair that you see.
-Become a member of deviantart-search for colour pencils and traditonal artists.
Sometimes other talented artists also gives W.I.P-s which is a very good way to learn.
I often search for these and then print them out and put them in my colour pencil-library.
-Look out for art blogs, of course.
-You can order some colour pencil books from the internet-unfortunately not all ships to Norway.

My next step will be to buy some Faber Castell colour pencils(the good kind, not the
 childrens kind;) When I have learned to use them then maybe I will make a tutorial on them too.


fredag 4. oktober 2013

"Take a ride with me baby!" Digital art, sexy woman riding red car

             
                                 I was inspired a little by Bridget Jones, from the scene in the first movie
                                 where she is off to a romantic weekend-Plus I wanted to do something
                                 like this a long time now.

                                 I used a reference photo and did research on how the dashboard
                                 (or what it`s called) on the front looks like.
                                  When you draw you will often find that things you have seen
                                  like zillion times is not the same thing necassarily to draw.

                                 You have to figure out the shape, and sometimes you have
                                  to adjust the colours a little bit, becouse sometimes you can
                                 actually make colours and brightness come out more than
                                 they do in real life.

                                 A good tip also to those of you who like to draw yourself, is
                                 to take a little time off from the piece that you`re working on
                                 and then go back-becouse you go a little blind, you don`t
                                 see perhaps little flaws and what you actually can do to make
                                 your work stand out.

                                 I know I sometimes look back at work and I think, oh, if I added
                                 that, it would be really cool!

                                 So,patience people! ;)

                                Have a terrific weekend!